
YOU WANT ME TO DO WHAT? A WEDDING CAKE

Baking has always been a love ever since I was in high school. Of course back then, my parents wouldn’t let me make much from scratch, because well it was a little expensive and I never had much time between school and extra curricular activities. None the less, baking has long been a creative outlet for me over the past 12 years. Something about the science and problem solving behind combining new flavors, recipes and art just gets to me.
It has always been a goal of mine to bake a wedding cake. I would religiously watch the food network growing up and stare in awww at the towering architectural pieces of edible art. Well lets just say I finally got the chance. It wasn’t a fondant covered master piece covered in sugar flowers, or a glorious butter cream sculpture that made your hand cramp from squeezing a piping bag too long. Rather a simple cake covered in a simple buttercream frosting.
My younger brother got engaged to his long time girl friend of 7 years at the ending of 2016. They were planning a wedding for June of 2017 and in Hawaii every one pitches in on the large affair. I have been baking for a while, as a hobby, and my sister in law asked if I would take on the task of making their wedding cake.
Of course, I said “yes” but in the back of my mind I was thinking…”You want me to do what?” Please follow me on my journey of planning, prepping and the crazy production of this baking first.
Planning
3-4 Months Out
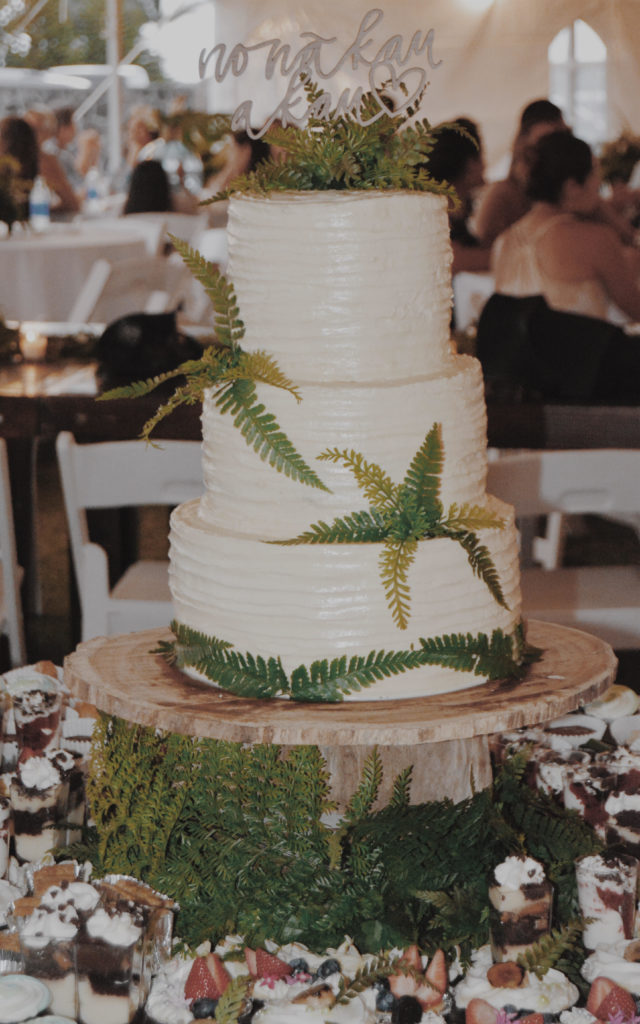
By all means I am no expert, but the planning process is definitely a must when it comes to tackling such a large project. We discussed the couples wants, taste, color, theme, size, and how it was to be displayed. My sister-in-law wanted a simple white cake covered in white buttercream and fresh native Hawaiian greenery. It was to be a centerpiece of their rather large and earthy dessert table. As we discussed further, she wanted a white cake, with a luscious lilikoi “passion-fruit” curd.
2-3 Months Out
Once we had an idea of what they wanted I needed to work out various recipes, design techniques, and a timeline. Three months before the event date, I tested out a recipe to see if the cake consistency would hold up to being stacked while still staying moist. Our test run was used for a small beach inspired smash cake, which I will post at a later date. Lets just say our test run didn’t go as well as we hopped. None the less the practice run was necessary.
We also set a timeline to pre-plan how we would get the cake completed on time for the event. Baking is not a profession of mine, but rather a hobby so it needed to be completed around a normal work schedule and all the wedding events prior to their reception.
Projected Timeline
1.5-1 week before event date: Bake all cake layers and make lilikoi curd (this could be completed in advance as lilikoi curd can be stored in the refrigerator for up to 2 weeks and cake can be placed in the freezer)
1 day before event date: Make vanilla pastry cream, butter cream frosting, assemble cakes, and finish decorating individual tiers.
Day of Duties: Stack cake, bring down to room temperature, finishing touches and display.
Production
Tools you will need for the project:
- Revolving Cake Decorating Stand
- Serrated knife
- Angled Icing Spatula
- Two of each sized Cake Boards to fit rounds (6″, 8″, 10″)
- Piping Bags & Tips (Or Freezer Ziploc bags)
- Spoon
- Wooden Dowels (One for each layer – Cut to fit cake height)
1 Week Prior to Event
Since cake can be frozen and kept for about 4-6 months we decided to bake all the layers of the cake one week prior to the event date. The recipe that you will find below was multiplied by 5. We were making a 3 tiered cake, each with three layers of cake; therefore, we baked 3 10 in rounds, 3 8 inch rounds and 3 6 inch rounds. We also made a few extra layers of cake just in case we had a baking mishap.
I utilized a cake recipe from thecakeblog.com. I found their amazing cake recipe for a rose buttercream cake. We pulled the recipe for the white chocolate cake and not only doubled, tripled or quadrupled the white chocolate goodness, but we actually multiplied the recipe times 5.
Since the cake was to be frozen we let each layer come to room temperature and wrapped them each individually in plastic wrap and then placed them in freezer gallon sized Ziploc bags. Before we assembled the cake we took the cake out a few hours before hand to let them come to room temperature.
While our cakes were baking and cooling, I made the deliciously tart lilikoi curd. We only needed one batch of this recipe as it was used sparingly due to its very tangy sweet nature. When we ran our test run, the amount of curd we used overpowered the rest of the flavors of white chocolate and vanilla pastry cream. So we decided to cutback on the amount of lilikoi curd used.
Lilikoi (or passionfruit) is something that is quite abundant here in Hawaii. I have large vines of 3 different varieties growing in my backyard. So it was a great choice with a local touch. I found an easy recipe for lilikoi curd that I really like from bellyrumbles.com.
1 Day Before Event
Before getting our pastry cream and vanilla buttercream made, we took out our cakes to thaw and come to room temperature. From there we started the process of making our pastry cream. We decided to start with the pastry cream first, because it needed time to cool before assembling our cake.
Vanilla pastry cream is something I have attempted before, and lets just say that I wasn’t all that successful. When I tried this recipe for vanilla bean pastry cream and it actually worked, I was so re leaved. The recipe came from a creme brulee cupcake recipe that I never tried, but I found the pastry cream to be absolutely delicious. You can find the original recipe at everything-emmy.com. Vanilla bean is quite expensive, so I opted for a cheaper version with vanilla extract instead. Once you have finished making your pastry cream, transfer it to a bowl and place a piece of plastic wrap directly over the surface of the pastry cream. This ensures that when you place it in the fridge to cool, that the condensation won’t cause your pastry cream to get watery or separate.
The next step is buttercream. I use to make simple buttercream, with loads of butter, powdered sugar and purees/extracts. So this was a first attempt at a European version. I have always been extremely nervous about the whole boiling sugar and pouring a hot syrup into the mixer and making a huge mistake, but the recipe in Miette’s cookbook was surprisingly simple. This cookbook is literally turning out to be one of my favorites. Often there is only one or two recipes that I actually like a cookbook, but Miette has actually turned out to be a go to spot for me as an amateur baker. I absolutely love this book. I stumbled across it at a used book shop at our local mall. It was honestly the best $3 I spent on a baking book. Although I found mine at a non-profit used book shop it is well worth the price. I have still yet to go through the entire cookbook, but so far it has been amazing. And I love all the little tips and thoughts that have been placed with each recipe.
Stacking and Assembly is definitely one of the more nerve wracking aspects of making a wedding cake for me. Let’s just say when we did a test run of this cake. It ended up a puddle of lilikoi curd, pastry cream and cake on the bottom rack of my fridge. With that in mind, make sure each filling is completely cooled before you begin assembly. Also you need to make sure you level each layer of cake. When you bake your cakes, they will definitely be uneven. Shave off the top with a serrated knife and try to make them as even as possible.
Take a cake board and place it onto your cake stand. Place a dab of buttercream frosting on the cake board to prevent the cake from sliding around. Place your first layer of cake onto your cake board, then top it with a layer of pastry cream and a few tablespoons of lilikoi curd.
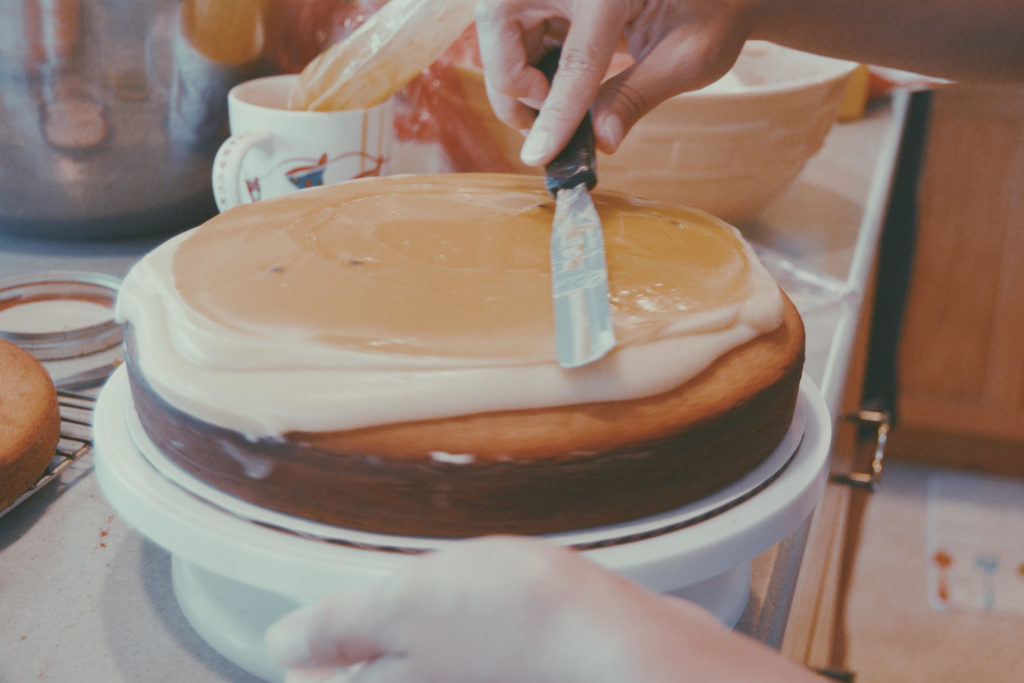
Then stack your next cake and repeat the layer of pastry cream and lilikoi curd. Then place your final layer of cake on the top. I would suggest placing the top layer of cack upside down so you get a more clean cut edge at the top of your cake. Next, run your angled spatula around the edge of the cake to get it as even as possible.

Measure your dowel by placing your dowel on the cake stand near he cake and mark with a pencil the height of the cake. Cut your dowel to fit and make sure your dowel won’t stick out at the top of the cake when placed into the center. Once you have done this you will need to insert the dowel right into the middle of your cake and make sure it hits the bottom of the cake board. You will then need to crumb coat your cake before placing it in the fridge to set. Take your vanilla buttercream and place a light layer all over your entire cake. Make sure to fill in all the holes between any layers as they may be a little uneven. Repeat the Assembly and crumb coat for your other two layers.
Let the cake set for a few hours to ensure they don’t slide around while putting your final coat of buttercream.
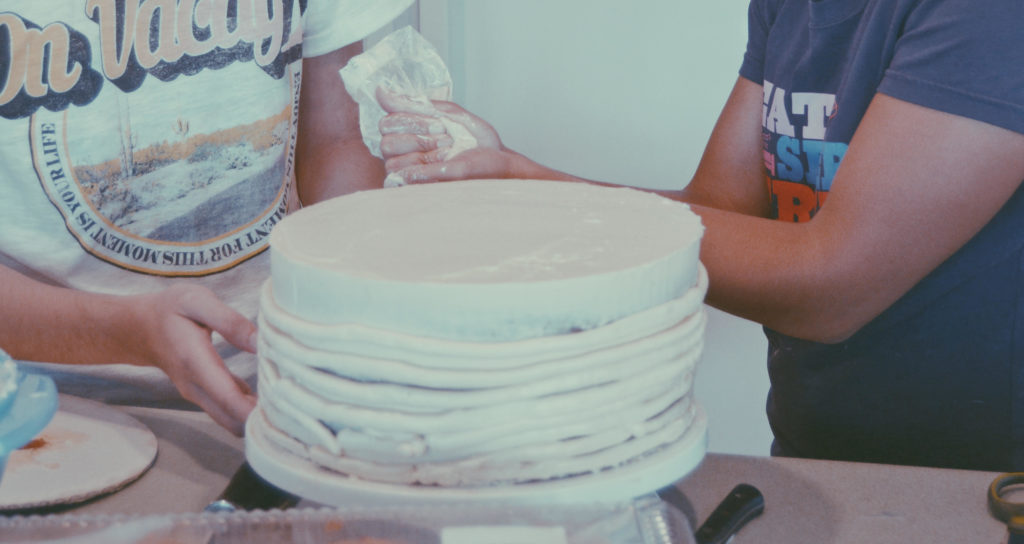
Take your cake and place it back onto your revolving cake stand. place your extra cake board on the top of the cake. this will help to make sure your cake looks straight and even on the sides. Run buttercream around the sides of the cake with your piping bag. Take the angled spatula and let the end sit on the base of the cake stand while the edge of your spatula sits against both the top and bottom cake boards. Spin your cake stand around while keeping your spatula still and steady in the same spot. Once your edges are smooth, remove the top cake board and place additional frosting on the top. Smooth the top of the cake out by, holding the spatula parallel to the cake stand and spinning your cake stand around a few times. Run your spatula around the edges One more time and to finish the top again take your spatula and drag the remaining icing toward the center of the cake in light sweeping motions.
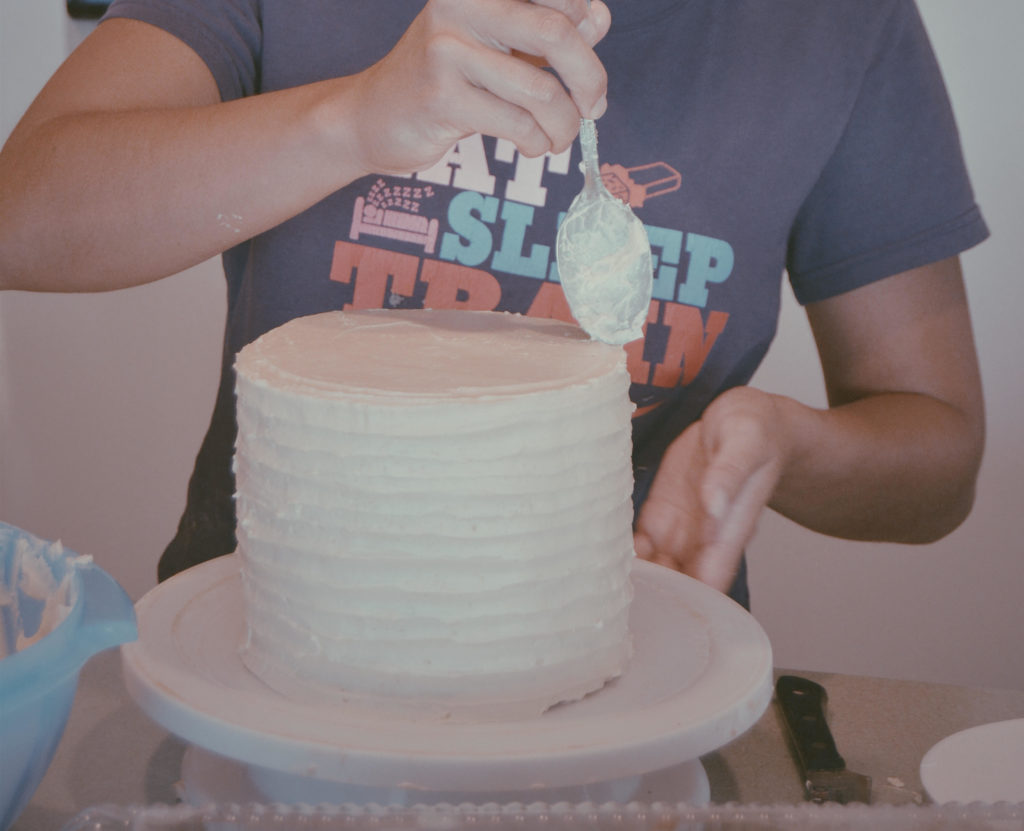
Once your cake is covered in butter cream, take your spoon and place it at the base of your cake stand with the point of the spoon lightly touching the buttercream. Spin your revolving cake stand around till you end up where you started. Continue to to this up the entire cake. Complete the two remaining tiers and place them in the refrigerator to set over night.
Day of the Event

Take our your three tiers and stack them one on top the other. Fill in the cracks between each tier with left over buttercream and create the same design with your spoon. Let the cake come back to room temperature. There will be condensation due to the change in temperature. Try to let the cake sit in the coolest room in the house and you can dab areas with too much condensation with paper towels to prevent the buttercream from separating or running. Once the cake is back at room temperature the buttercream cakes should sink into the layers below so they won’t move. Once you have stacked your cake you can now decorate. (You should also be able to prevent the preparation on the cake by not placing it in the fridge. However, due to this being a project that was completed over a few days and not having a commercial kitchen and all the right equipment, we decided to store our cake in our refrigerator overnight.)
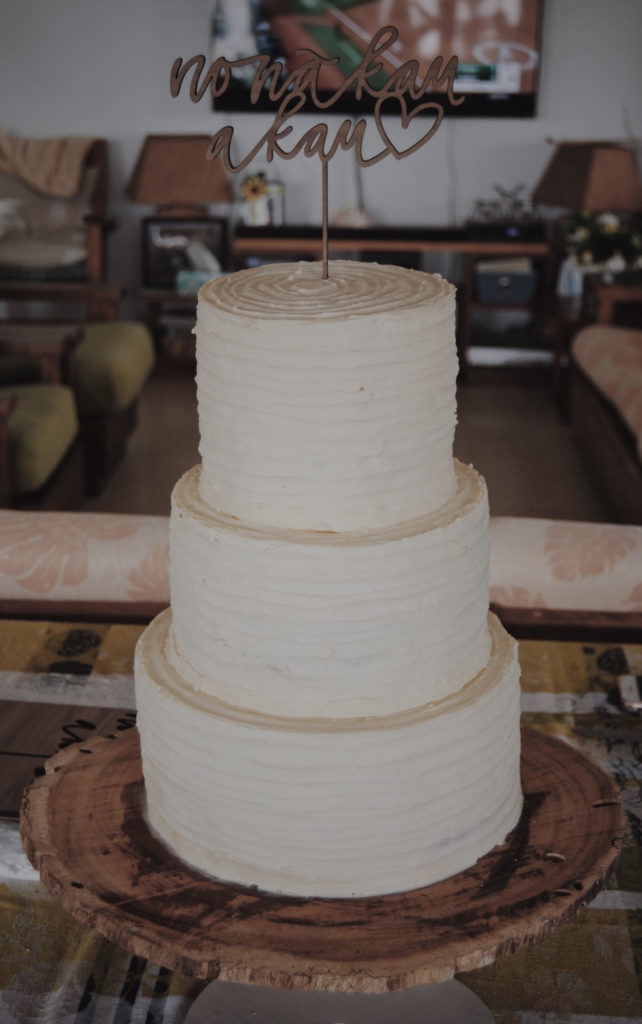
We used simple local ferns and a cute cake topper by an etsy designer. More info to follow.
Lets just say that this was a daunting task and I learned so much. Some of the most important things I learned are that you can never rush a large project like this. Therefore, it may be a good idea to plan ahead. I hope the outline gives you an idea of how to plan and prep prior to your big day.